Icemaker
Tips
(Have a baby bottle?)
Anybody know what babies and icemakers have in common?
Well, OK, maybe not much, but here's one very handy detail: 80% of all the icemaker problems
you'll see can be corrected using a baby bottle!
Icemakers are set to fill for X seconds regardless of actual water flow, and the volume of water
required is specified in cc's. It just happens that a baby bottle's a really handy icemaker repair
tool, because it is graduated in cc's! And it's compact enough to fit into those cramped freezer
spaces where icemakers reside. Not to mention it's always good for a few questioning looks (techs: leave the nipple on, carry it in plain view in your tool bag, and see what happens!)
But I digress. If your icemaker is producing small cubes, hollow cubes, huge
cubes, or a solid slab of ice, one of the first things you want to check is the fill level. And it's not as difficult as you
might think. (Hey, the hard part's wrenching that bottle out of Pookie's little fingers!) Unplug
the refrig, pull the icemaker - usually one screw underneath, either 2 more or hooks above the
cube mold - and unplug it. Take it to your sink and melt out any cubes with hot water. Then plug
it and the refrig. back in, leaving it unattached from the freezer wall.
Manually start a 'harvest cycle' (see below) and hold Pookie's bottle under the fill tube. You'll have to wait a few minutes,
because the water enters near the end of one complete rotation of the cube ejector, which
constitutes a 'harvest cycle'. Regardless your type of icemaker, you're looking for 125-150 cc's,
with most working best around 140cc's, but anywhere in this range should work OK.
(When replacing your icemaker with a new one, always
check and adjust the water fill level this way too. You'll save yourself
a lot of trouble.)
Manually starting a 'harvest' cycle:
Note: Some newer model
refrigerators require freezer door switch closure to power up the
icemaker. If your icemaker doesn't start when you jumper or turn it,
hold or tape the freezer door switch closed.
(Thanks for the reminder, Ray!)
Two basic designs of domestic, analog icemakers are most common. (Electronic models come &
go from time to time - shudder - but we aren't seeing them in great numbers - yet)
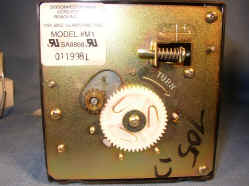
Pop the front cover off yours and check the large gear front & center. If
the front plate is metal, and you see a Phillips screw
in the center of this gear, that's great - you own a 'microswitch'
design. This is the most
reliable home icemaker ever made! Here's what it looks like with the front cover
off:
To manually start a cycle, either grasp the ejector and rotate
upward (CW fr. front), or use a screwdriver to turn the smaller gear (CCW) if yours has a slot for
this. Once you turn it a short distance, you'll hear a little 'click and the unit will start to run. Make sure the ice-sensing bail has clearance to raise & lower during this test cycle.
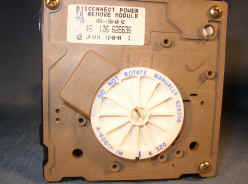
If there's no screw, that's OK too, you own a 'modular' unit, and even though we, um, make more
income from these <grin>, they're still pretty decent. Here's what a
modular looks like with the front cover off:
To start a cycle with this one, don't attempt
to turn the gears manually - they'll break! You'll need a short piece of
insulated solid copper wire, 12-14 gauge, to use as a 'jumper'.
Note: Before proceeding, I
want to stress this jumper wire must be insulated, because you're
holding onto a 'live' 120 volt jumper here. The usual
precautions apply (please see my
disclaimer
page)
(Just strip a 4 in. piece out of some 12-2 'romex'
used in house wiring.) Strip the ends back about ¾ in. and bend it into
a 'U' shape. This wire is inserted into the holes marked 'T' and 'H' in
the front of the icemaker to bypass the tstat and run a cycle. (don't
insert it into any holes except 'T' & 'H' !) Remove the jumper after a
few seconds - you'll hear a tiny click - and let it run, waiting
for the fill at the end. Again, make sure the ice-sensing bail has clearance to raise & lower during
your test cycle.
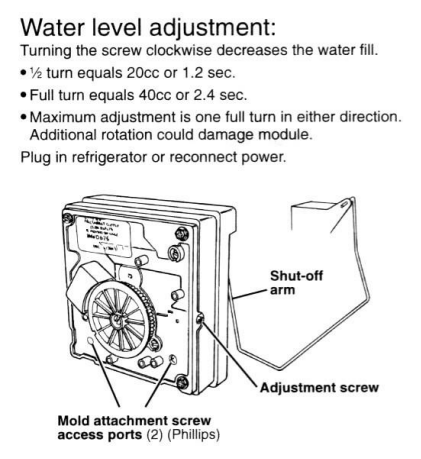
Both icemaker styles have a small screw to adjust water levels. The modular type has very little
adjustment available, though (even though the literature says 20 cc's, I
only find about 10 cc's available, via a tiny plastic screw on
the right side - see picture below), which means the other components in the water supply have to be
right (saddle valve mounted properly - not to bottom of pipe, clean fill valve screen, etc) Just rerun a test cycle after each
adjustment. And be sure to wash & return Pookie's bottle when finished with the test.
Was this article helpful?
Please click the "donate" button on the left side of
this page to help me keep this information free!
Many Thanks! - Dave
Copyright www.DavesRepair.com
This article may be reprinted and distributed freely only
in its entirety, including this message.
|