The
DRSNews
January
2004
Happy
New Year!
In this issue:
1) Dirty Dishes? Check This First
2) Check This Second
3) A Simple Little Tool for Installing Valve Screens
I thought I’d dedicate this issue to a couple of quick tips
on that most overworked and ‘underpaid’ machine in our
kitchens – the lowly dishwasher. (Did yours survive all
those Holiday dishes?) We’ll be talking more about DW’s
in the future and posting articles on the upcoming website.
Please stay tuned!
1) First of all, the most important resource your machine needs to do its job is *hot* water, and I see many cases where they just don’t get it. At least not in the first wash.
Let me explain.
Basically, a dishwasher fills with fresh, hot water, dissolves detergent into it, and sprays the solution onto your dishes for a while. After draining this water/detergent solution, then repeating this process several times depending on how dirty you’ve ‘told’ it your dishes are, it runs through the process minus the detergent, rinsing them with clean water. Then some sort of dry cycle takes
place (in winter we just open ours and roll out the racks, which puts the dishes about 3 feet from the woodstove. This dries them *very* fast!)
One of the most common causes of poor DW performance is simply wash water that’s not hot enough. In many cases this is due to house plumbing that puts the DW too far from the water heater.
For example, if your home uses ¾ inch pipe and the water heater’s 20 feet away, there’ll be nearly ½ gallon of *cold*
water entering the machine before any hot water arrives!
This wasn’t as much of a problem years ago when DW’s filled with a lot more water than today’s more water-conserving
models.
The newest Whirlpool ‘tall tub’ machines, for example, use only 1.8 gallons per fill. Some use even less. That means 25% of the first fill will be made up of cold water, and much of the first wash will be a waste of time and energy.
Dishwasher detergents are formulated to do their job in hot water, and wash results can really suffer if it’s not available.
The simple fix - and I know you’ve already figured this out – is simply to run the water at the adjacent sink until it gets hot, *then* start the dishwasher. Try it - it can make a world of difference.
2) Another problem, just as
common, is too little water. Dishwashers are ‘time-fill’ critters, and aren’t that ‘smart’.
That is, they energize a fill valve for X amount of seconds and then start to wash, whether there’s actually any water in them or not.
If there’s any sediment in the water supply (present in most, especially out here in the country where we’re on well water),
some of it will eventually end up in the dishwasher’s fill valve, and can drastically lower the amount of water that ends up in
the DW after these X seconds.
If your machine’s just not doing the job it once did, and the water temperature in the first wash fill is 130F or more, have a look at this. Once it’s filled and begun to wash, open the door and take a look at the water level. It’s tough to tell you exactly what your level should be, because they’re all a little different. But a rule of thumb is: the bottom of the tank should be completely covered, and there should be water partway up the side of the overflow float. You’ll see this
little float just inside the door, in either the right or left front corner of the tank.
The Good News: Just like clothes washer fill valves, DW fill valves have a fine stainless steel screen that often clogs, but can be cleaned. I do this job on a regular basis.
The Bad News: This screen can be a BEAR to get to! But it can be done,
and without too much fuss if you’re a little handy, and patient (and subscribe to The DRSNews <grin>).
Turn off the power and water to the machine, pull the bottom panel(s), and you’ll see the fill valve, usually on the left side,
with 2 wires attached. In most cases, you won’t have to completely remove the valve to do this. If yours is connected with a flexible
water line, it’s even easier.
I like to have my wetvac
handy to catch any water that spills
from the valve and water line when I do this.
Using a magic marker, mark the position of the inlet in relation to the plastic valve body. With a ¼” socket or nut driver, remove the 4 screws that hold the plastic body to the inlet. You’ll see the screen inside the plastic part, most likely buried in sediment.
These screens are reusable after cleaning, so carefully pry it out with a small screwdriver, scrub it using an old toothbrush or scrub
brush, and you’re halfway there.
Note: as in clothes washers, be sure you reinstall this screen – it must be there, or you risk a flood!
Keep reading to find out about a neat little tool to easily reinstall
this screen without damaging it.
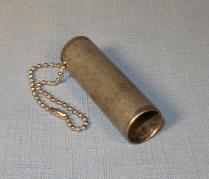
3) There’s a little homemade tool I’ve used for about 20 years to neatly and easily reinstall fill valve screens in dishwasher, clothes washer, and icemaker valves (some newer clothes washers use a different style screen these days, but there are still a ton of them
that don’t)
It’s just a 2 inch length of ½” steel electrical conduit with the
end
sanded lightly to remove any burrs. Put the screen onto one end,
and it’ll push back ‘home’ easily. Give the tool a little twist,
pull it out, and you’re done. You can usually scrounge a short piece of this
from most any electrical supply house or your friendly neighborhood electrician. Cut it with a tubing cutter to ensure a square end.
The job can be done without one of these, but it’s pretty easy to dent and damage screens, so this is one I recommend. The problem with ‘occasional use’ tools like this, though, is finding it when
you need it. Maybe attach it to your washer fill hoses, or the
faucet(s)?
***
Sincerely,
Dave Harnish
Dave’s Repair Service
New Albany, PA
drs@sosbbs.com
‘Blessed be the Lord, Who daily loadeth us with
benefits, even the God of our Salvation. Selah.’
- Psalm 68:19