|
The DRSNews
January/February 2010
A Very Happy New Year to you (a little late)!
Published by subscription only, by Dave's Repair Service
(c)2010 All Rights Reserved
WELCOME to all of our new subscribers this month! I
truly appreciate you!
DRSNews Subscribers are THE BEST!
What is it about January?! Seems like every year it's
an absurdly busy month,
and I fall even further behind than usual! So far this one's been no
different
and once again I've had to combine the Jan & Feb issues. - Dave
WHO ELSE WOULD LIKE THIS NEWSLETTER?
If you enjoy this issue, you're welcome to forward its link
to any friends or
associates who might find it useful.
***************************************
In this issue:
1) How to Use Electrical Boxes to 'Tame' Those Big Washer Springs
2) Subscriber-only 'Two or More Ship Free' Sale's Still On!
3) Repairing and Preventing a Common Problem With Your Front Load Washer
|
"There are two ways to conquer and enslave a nation. One is
by the sword.
The other is by debt." - John Adams
($30 trillion and counting...) |
1) Here's a little trick I've used many times over the years
but had forgotten to tell
you about. 'Don't think I ever mentioned it before, and it's been a
real timesaver
for me.
It had been a while since I used it, but it saved me a bunch
of time and hassle again
recently on an older Maytag 'Dependable Care' washer, which reminded
me that I
should share it with you.
When dealing with the heavy vertical springs used in some brands of
top load washers,
there's a simple way to 'unload' their tension to work on the
machine's snubber area,
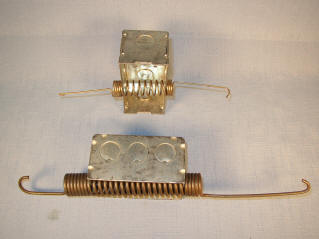
using steel electrical 'handy boxes'. These are the surface mount
boxes normally used
to mount receptacles and switches onto a wall.
By tilting a washer's tub away from it, stretching the spring,
then inserting a box into
its coil, the spring will remain stretched and can easily be
unhooked.
If you break or cut off the screw tabs on the top and bottom of a
box, it can be inserted
into a spring either vertically or horizontally, making it even
handier.

I've carried the same 3 of these modified 'handyboxes' in my
truck for many years (that's
why they look so ratty!), and have used them a lot. There've been
just a few times I when
wished for 5 rather than just 3, mostly on some of the older Speed
Queen and Maycor/
Admiral machines, but 3 will usually suffice.
2) I've been seeing a lot of front load washers lately that
won't drain, and/or 'throw' an error
code, then refuse to continue working. Some common error codes,
varying among brands,
are 'F/02', 'F21', '07', '01', etc. The good news is, this
one's usually a clog in the drain system,
and is pretty easy to fix yourself.
Regardless which error code, if any, your machine might
display, the first thing to check is
the drain system, specifically the pump and sump area.
Most of these are located right in front, behind a bottom
access panel - in Whirlpool and
most Frigidaire designs, at least - so you won't need to move the
washer to check it.
There are usually 3 screws holding that bottom panel on, right
down at the floor. I use a small
wedge block to prop the washer front up a bit to make it easier to
get to these screws, then
pull off the front panel.
Hold your wet-vac hose tightly against the end of the drain
hose and run it for 15 seconds or
so, in case it's not a total clog, to pull as much water out of the
sump/filter as possible before
removing the access cover or hoses. And keep it handy to catch the
water left in the sump
area.
A shallow pan or several large towels can also be used to
catch any water left in the sump (as
you know, I'm a wet-vac 'fanatic' because they're so fast and
handy.)
It's amazing how much pocket debris, change, and lint gets
caught in one of these traps with
a washer still able to function. I regularly see them totally packed
with lint and debris, even
when they haven't yet 'thrown' a code or started to cause any
obvious trouble.
Check your owner's manual for the presence of a 'cleanable'
trap in your model. I recommend
doing this little chore every year, and while you're down there,
also taking a peek inside your
dryer for lint buildup. It just might save you an expensive service
call later.
***
Once again, thanks for allowing me into your inbox! I
will never take that privilege lightly.
May God richly bless you and yours in 2010,
Dave Harnish
Dave's Repair Service
New Albany, PA
drs@sosbbs.com
www.DavesRepair.com
Pray for Obama
Psalm 109:8
Copyright
www.DavesRepair.com All Rights Reserved
This information may be reprinted and distributed freely, but
only in its entirety, including this message
|