|
The
DRSNews
June
2006
Published by subscription only, by Dave’s Repair
Service
©2006 All Rights Reserved
A Special 'Hello' to all my
new subscribers! What a great bunch of new friends I make every day with this
little project!
In this issue:
1) How to Replace Your Whirlpool-built 29 inch (wide) Dryer’s Belt
2) Testing Refrigerator and Freezer Compressors
1) I talk to a lot of folks
with broken dryer belts, and the Whirlpool/Kenmore 29 inch (wide) dryer is by
far the most common machine out there these days. This one’s quickly
identified by its lint filter, which pulls up through the top of the cabinet. These
are also sold under the Kitchenaid, Roper, and Estate brand names (and hopefully
Maytag soon - Whirlpool recently bought Maytag!)
Note: belt replacement on the
27” wide version of these dryers is quite a bit different. I hope to go over
that in a later article, but I do have a very inexpensive ‘basic service
manual’ available for immediate download that covers it, too. You’ll find it
posted on the website.
To get yours apart for a
clean/lube (recommended at least every 2 years), belt replacement, or just for
fun <grin>, first remove the two screws under the lint filter (careful
here - don’t drop them down the lint filter housing, where they get into the
fan!)
Then insert a putty knife in
the gap between cabinet top and cab in front, and push back to release the
retainer clips on each side. The top will lift, and you can swing it up and
back, out of your way. Often you don't need the putty knife, but can just pull
forward on the cabinet top and the clips will unhook.
If yours has a separate bottom
panel, remove it by either pulling on its top edge or using a putty knife to
push the retainers, and swing it down. Then it'll lift off its bottom hooks.
Roll the belt off the motor
pulley and idler (note how the belt runs through the hole under the idler
pulley and the idler hooks into the base). Unhook the door springs and
set them aside. Keep an eye on the door - it'll want to fall
down on your head at this point!
Loosen the two 5/16"
screws that the bottom of the front panel rests on. Then remove two
screws from the inside that hold the front panel on, tip it forward, mark
the door switch wire locations with a magic marker, and pull them
off. Then lift the front panel off and set it aside. (Note: if yours
is a newer model with a one piece front panel, just remove the two screws and
lift the panel off its bottom clips.
Once the front panel's off,
the drum will lift up and come right out the front.
Vacuum it out well and oil the
rear drum rollers or replace them if their bearings are really worn and
noisy, and also oil the idler pulley bearing (use a good grade of oil, sewing
machine oil, ‘3 in 1’, etc - no WD-40, please!) - and put her back together.
The routing of the belt around
the idler pulley can be tricky on these the first time you do it, because it’s
hard to picture. Loop the belt around the drum with the grooved side against the
drum. Then, with the drum in place,
install the idler into its slots in the dryer base. Slip a loop of the belt
through the rectangular hole under the idler and roll the loop onto the motor
pulley. It helps to have a helper holding the drum, but after you do this once
or twice, you can hold the drum with your left knee while reaching back and
doing this.
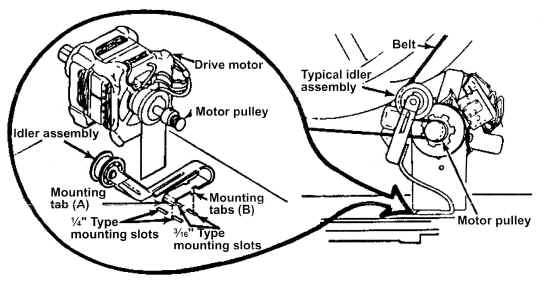
The job’s a lot easier on
older models with the separate bottom panel, because the panel holds the drum up
for you. But I’m told these kinds of contortions are actually healthy,
stretching out muscles that otherwise get little use. And who knows, Ringling
Brothers may one day have an opening for this kind of work, so it pays to be
prepared <grin>.
Anyway, double-check that
there's good strong airflow out the back before reconnecting the vent, then
connect it and run it on 'fluff' with no heat, and go outside and
double-check that the airflow outside is also good and strong. It's easy to kink
the vent duct when you push it back, and this step will make sure all's well in
the airflow department.
Part number 4392065
is a nice money-saving repair kit for these machines, and includes not only a
new belt, but also an idler, both drum rollers, and the necessary hardware. This
kit is the most economical way to purchase these parts, and I'm really glad to
see Whirlpool put the kits together. Costs much less than buying these parts
individually, like we did before these were available.
***
Like Movies? Try Netflix,
we love it! $9.99/month for all the movies you want, mailed on DVD –
fast! A really nice system, and they even pay postage both ways!! (It
used to cost me $6 in gasoline just to get to the rental store and
back!)
***
2) Here’s something else I
get a lot of questions about: testing refrigerator and freezer compressors. So
let me go over the simple procedure I use whenever I run into one that’s
‘short-cycling’ (trying to start, clicking on/off every few seconds, or in
some cases, every minute or two).
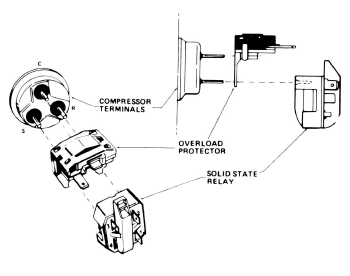
Basically,
using a digital ohmmeter, you pull the compressor's relay and overload off its
three terminals, then check the resistance between each of these three
pins. Older relays looked a bit different than the solid state one below, but
pulled off pretty much the same way.
First
note the two pins that read the highest resistance. The one that remains is the
'common', to which one end of both the start and main windings connect. (The
common's not always the top pin, so you'll want to do this test to be sure)
Reading
from that common to each of the other two, carefully note each reading. Then
measure back across the two with the highest resistance, ignoring the
common. That reading should be the exact total of the two individual coil
readings, because you're reading through both coils in series now.
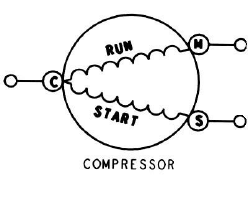
If
those two sets of readings aren't within about 1/2 ohm of each other, then one
of the compressor windings is shorted, and if it runs at all, it'll run hot and
usually end up short-cycling on its overload protector.
The
only solution, if that’s the case, is compressor replacement - a major job,
and one I usually don’t recommend any more due to the expense.
If the windings test OK, but
it still won’t run, then I connect a test cord and try to run it manually. If
I can’t start it that way, it’s most likely a mechanical problem, most often
binding bearings, and the ‘bottom line’s the same: either the compressor or
refrigerator will have to be replaced (I’ll be discussing test cord
procedures, and how to make your own, in a future article).
PS - Those 5 baby Peregrine
Falcons in Harrisburg we showed you last month have been growing like weeds, and
will soon take to the air: http://www.dep.state.pa.us/dep/falcon/
May God richly bless you,
Dave Harnish
Dave’s Repair Service
New Albany, PA
drs@sosbbs.com
http://www.DavesRepair.com
"If a nation
won’t be ruled by God, it will be ruled by anarchy"
- Winston Churchill
2 Chronicles 7:14
Copyright 2006 www.DavesRepair.com
This information may be reprinted and distributed freely only in its
entirety, including this message.
|