|
The DRSNews
April/May 2007
I apologize for the missing April issue, guys. The company that emails this out
for me went down in late March, and with NO customer service (!), it took a
while to get back up and running. (Needless to say, I’ve switched companies!)
By subscription only, Dave’s
Repair Service
©2007 All Rights Reserved
Could you do me a favor,
please? I’d really appreciate it if you would help me build our subscriber list.
Please don’t forget to invite your friends to subscribe to The DRSNews!
Just forward them an issue
with a note telling them why you like it, and/or send them to
www.DavesRepair.com . Thanks!
(Scroll to the end to
unsubscribe at any time)
***************************************
A Special Welcome if you've
just joined us! What a great group of friends I've been making with this
project! You guys are a tremendous encouragement to me! Thank you!
In this issue:
1)
Refrigeration System Recharging Basics, Part 3:
Leak Repairs
2) Trading Crosses
Don't spend all that money on 'OEM' ink! The Best
inkjet cartridge prices ever - at least for our Epson
printers (Used to pay $30 for inkjet cartridges - now
I pay $3.95!) You'll love these guys! I've used their
ink in all our printers for the last 4 years, and highly
recommend them: Inkjet Cartridges and Toner
|
1)
OK, it’s been way too long! Let’s get back to talking about refrigeration
system repairs. (Note: this series is just a quick overview. We’re just skipping
stones over the surface here, but hopefully it’ll be of help to you)
(I hope to eventually
publish these articles in one e-book to make it more convenient, and so we can
go into more details
of these procedures)
Last time, we briefly
discussed figuring out whether your system’s leaking or restricted, and some
methods of locating refrigerant leaks.
Thought I’d get into some of
the basics of the actual repair procedures this time, and how they relate to
where the leak’s located.
Before we proceed, let me
mention two things:
I’m assuming some degree of
technical expertise on your part here, and am obligated to point you to
my disclaimer. Messing with refrigeration
systems involves heat, pressurized gases, and other ‘fun’ ways to hurt yourself!
Be careful!
Today’s refrigerants are
highly hygroscopic, that is, they readily absorb moisture from the atmosphere,
and moisture’s one of several ‘baddies’ (along with air and dirt!) that you
can’t have in a system. Which means you want to complete this job as quickly as
possible, without exposing the system to the atmosphere any longer than
absolutely necessary.
That’s the #1 reason I
recommend that modern refrigerant system repair is one of the few jobs better
left to a pro. It takes experience to be able to do one of these fast, and a
system max open time of 20 minutes is the number I shoot for. Not easy to do
your first time. Hard enough to do after several decades of experience!
Most leaks occur at tubing joints, and the trickiest ones are where dissimilar
metals are joined. Copper and aluminum don’t ‘like’ each other, and for many
years now they’ve been connected together, most often in the evaporator coil
inside the freezer section, where the temperatures swing from below zero F to 50
or 60 F.
(I should mention that
copper/aluminum connections aren’t usually soldered, but other methods are used
to join them, like epoxy, o-rings, crimp connectors, etc. )
All that expansion and
contraction makes it really tough to maintain a sealed connection between two
metals with different expansion rates. And there’s plenty of moisture present to
aggravate corrosion, so everything has to be done perfectly for the joint to
last.
You’ll also see leaks down
in the compressor compartment, and, although not as tough to repair, you’ll
usually find two metals, steel and copper, connected together there, too, and
getting leak-free connections on the first try can be challenging.
Leaks can occur inside
cabinets as well, often in what’s called the ‘Yoder Loop’. These leaks can be
hard to diagnose, and unique methods are used to repair them, but that’s a
subject for another article.
Most systems are brazed at
the factory, but even though many servicers repair them using brazing, I’ve
always ‘silver soldered’ my jobs using lead-free low temperature silver-bearing
solder. This is a lot like the old 95/5 solder we used in the ‘old days’, and
one reason I’ve used it and like it is the relatively low temps required.
When we used to braze
joints, I didn’t like the damage all that heat caused to the surrounding
components, and I’ve found that it’s really not necessary.
I still have quite a few
‘soft-soldered’ systems operating here in our area that were recharged 20 years
ago or more, including one of my own freezers, and they continue to perform
perfectly.
This is getting long, so let
me just leave you with some tips to soldering good tubing joints (these apply to
water piping, too):
A)
No pressure in system: before starting, be certain all refrigerant is out of the
system, and that it’s open to the atmosphere. Any pressure buildup inside - and
it can build from torch heat - will ruin the connection, and you’ll have to
start again.
B)
Cleanliness: you cannot have a joint too clean! Before soldering, sand it until
it sparkles, and wherever there’s an insert tube, sand its OD and before
inserting it, clean the larger tube’s ID with a stainless steel tubing brush
sized to it.
If the tubing cutter left much of a ‘burr’ on the inside, carefully drill it out
with the proper sized drill, then briefly vacuum the tube end to be sure no
drill shavings found their way inside, where they can cause trouble.
For sanding tubing, I recommend a cloth emery paper roll called SandScreenä,
another product that’s superior to any other I’ve tried over the years. It used
to be marketed by Gemline, now out of business, but most refrigeration supply
companies still carry it.
C)
Swage it: rather than connecting a joint with couplers, I swage the copper
tubing to make the connection. That eliminates one joint, which means there’s
one less potential leak site)
D)
Even Heat: I use a dual tip acetylene torch, which makes it easy to surround the
tubing with flame, and heat the area evenly. Another benefit of two opposed
flames is heat containment within a small area. This is indispensable when
working in today’s tight compressor compartments, with all the heat-sensitive
plastic and rubber parts nearby.
E)
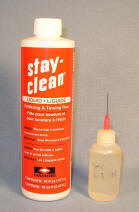
The Right Flux: I’ve tried nearly all of them over the years, and IMO there’s
only one flux to use. Stay-Cleanä
liquid flux, made by the JW Harris Co, does an exceptional job of preparing
copper and steel tubing to receive soft solders, and I highly recommend it. It
can be hard to find, but accept no substitutes! It is corrosive, though, so one
of my last steps in a system job is wiping up any flux spills with liberal
amounts of water. While a joint’s still warm, wiping it off with water will
clean off any excess flux and make it shine, preventing future corrosion.
| Here's the best flux I've ever
found. I've used it for many years, and it's never disappointed.
I keep it in one of my
"precision oiler bottles", which not only works well at putting
a tiny drop of oil right where it's needed, but also happens to be a
terrific way to apply this flux! |
 |
By the way, be sure to heat the joint a bit first, then apply the flux. I think
that one tip, learned the hard way, has improved the quality of my small
diameter ‘pipe fitting’ at least 10-fold.
I’ll have to end there for now. We’ll continue this next time.
2)
I’m facing some new challenges right now
(who isn’t?), and here’s one that really helps me to keep it all in perspective.
I know it’s ‘off-topic’ (maybe not the first time that’s happened in this
newsletter, ha, ha!), but thought I’d include it, because I’ll bet you can
relate…
A young man was at the end of his rope, and, seeing no way out, he dropped to
his knees in prayer
"Lord, I can't go on," he said. "I have
too heavy a cross to bear."
The Lord replied, "My son, if you can't bear its
weight, just place your cross inside this room.
Then, open that other door and pick out any cross
you wish."
The man was filled with relief and said, "Thank
you Lord," and he did as he was told.
Upon entering the other room, he saw many
crosses; some so large the tops were not visible. Then, he spotted a tiny cross
leaning against a far wall.
"I'd like that one, Lord," he whispered. The Lord
replied, "My son, that is the cross you just brought in."
When life's problems seem overwhelming, it helps
to look around and see what other people are coping with. You may consider
yourself far more fortunate than you imagined.
***
Thanks again for inviting me
into your inbox. I don't take the invitation lightly, and please rest assured I
will never share your name or data with anyone!
As always, if you have any
topics you’d like to see discussed here or covered in an online article, let me
know and I’ll do my best to oblige. And don't forget to
send me a testimonial (I'll bribe you for
one! <grin>) Many thanks if you already sent yours in!
May God richly bless you and
yours,
Dave Harnish
Dave’s Repair Service
New Albany, PA
drs@sosbbs.com
http://www.DavesRepair.com
"When
you were born, you were crying and everyone around you was smiling. Live your
life so that when you die, you're the one who is smiling and everyone around you
is crying."
Matthew 6
Note: Nearly all 5-1/2 years of DRSNews back issues are now available
to subscribers (only)! Sign up today -
it's FREE!
Copyright 2007,
www.DavesRepair.com , All Rights Reserved.
This newsletter may be reprinted and distributed freely, but only in its
entirety, including this message.
|