The DRSNews
October 2004
In this
issue:
1) Why There's a Pair of Nylons in My
Toolbox
2) Are Your Sockets Thrown in a Box? Chain
'em!
3) Solving Your Refrigerator's Drain
Problems
(I'm still
looking for testimonials to post on my website, and
I'll BRIBE you for yours! <grin> Visit: www.DavesRepair.com/testimonial_invit.htm )
1) OK, I'd better explain this one pretty
fast! Whenever I hear the complaint 'My washer's tearing clothes', I make sure I
take some nylon hosiery along on the job.
Rubbing
an old pair of nylons or pantyhose around the inside of
the washer tub, including the agitator and its edges, is a
great way to find the sharp spot that's causing damage.
You'll
feel the hosiery catch on whatever's causing the problem.
It's often a burr or sharp spot on the agitator. It doesn't
take much of a burr to catch knits.
I've
carried old hosiery in my toolbox for years, and although
they can raise a few eyebrows now and then, they really
are a handy tool (Honest, Dear!).
2)
Here's a really neat tip for keeping all those sockets organized,
especially now that we have to keep several sets of
both standard and metric ones on hand without getting
them too mixed up.
Store them on a chain.
Strings each set, from
smallest to largest, on a piece of beaded chain
(typically used for light-fixture pulls, but the bigger, heavier duty stuff).
When you need a
specific type and size of socket, just rotate the chain
connector to that socket, open the chain, and remove the
socket. Hardware stores sell beaded chain by the foot, so you
can customize the loop size for any socket set.
I have a box of 'backup' sockets, both English and metric, that I
use only occasionally, and this little trick makes it a LOT
easier to find the particular one I'm after - fast!
3) Here's a little trick I've used for
over 40 years, and it's saved countless return trips on
refrigerator jobs.
One of the most common problems with frost-free refrigerators is drain freeze up. This is
usually caused by the defrost drain clogging, then freezing. On
older units, it can also happen when the insulation around the
drain gets 'waterlogged' - as it usually does over the
years - and no longer keeps the drain above freezing
temperatures.
The first symptom, at least in top-mounts, is
water under the crisper drawers, on the floor of the
refrigerator section. (In side-bys it'll appear as a slab of ice on
the freezer floor).
Before I found this little trick, this was a
frustrating problem that was hard to keep from recurring.
Now I keep a handful of 'drain heat exchangers'
in the truck, and use a dozen or two most summers, when
humidity is highest and refrig. drains have to handle the
most water.
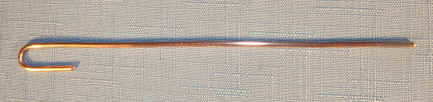
These are easy to make. Just cut a piece of #12
copper wire (strip from regular 12-2WG 'Romex' household wiring
) about 6 inches long and bend it around a 1/4 inch
round rod. A screwdriver shaft works well for this, but any
1/4 inch dia. piece of metal will do. They look like
this:
Now when your refrig drain clogs and you find
the trough under the evaporator full of ice, here's what
you do. Clear the ice, open the drain (use hot water in your one
gallon pressure sprayer and the wet-vac - you DO read the
DRSNews back issues, Don't You? Hmmm?), and hang this little
piece of copper on the defrost heater, so it extends down
the drain. On most units, this is a black rod under the
evaporator coil. Some use a radiant heater inside a glass tube, with
which you can use this method, but you must carefully bend the
hook on your copper wire to the diameter of the glass, being
sure it puts no pressure on the glass.
This heater is responsible for melting all that
frost that we don't have to deal with since the advent of
Frost-free units, and it glows a dull red during the defrost
cycle, so there's plenty of excess heat for our purpose.
Anyway, since copper's such a good conductor of
heat, some of the defrost heater's energy will transfer
down the copper wire, into the drain, and keep it open. What I like to
call 'stupidly simple', this uses no extra electricity and
works very well!
One precaution: hang this piece of copper
*loosely* over the defrost heater. Don't squeeze or crimp it on, or
you risk damaging the heater.
***
Thanks
again for inviting me into your inbox!
If
you have any topics you'd like to see
covered in an online article, let me know and I'll do my best to oblige. And don't forget those testimonials! Thanks to those of you who've already sent yours in! I'm posting them just as fast as I can! You guys are great!
May
God richly bless you & yours!
Sincerely,
Dave Harnish
Dave's
Repair Service
New
Albany, PA
drs@sosbbs.com
www.DavesRepair.com
Isaiah 40:31
Copyright
www.DavesRepair.com,
All Rights Reserved
This article may be reprinted and distributed freely only
in its entirety, including this message.