| The DRSNews February 2004
By
Subscription Only
Note:
to ensure this newsletter gets through all the In this issue: 1) Diagnosing Washer Overflow Problems [Welcome! I've been seeing a lot of washer fill problems lately, due in part to the severe cold here in the NE. So I thought it might be a good time to talk about common washer problem fill system failures. Overflow's one of the worst, so let's dive right in!] 1) An overflowing clothes washer is usually caused by a 'stuck-open' fill valve, and the cold water half of the valve is most often the culprit. This is because any sediment in the cold side of your house water system comes directly to the washer valve, while on the hot side most of it settles to the bottom of the water heater and never reaches the washer. But this can also be caused by the fill system control components: pressure switch, pressure tube, or pressure tube dome/port. So let's take a quick look at these. First of all, determine whether your overflow condition is 'physical' or electrical: start the washer filling, then turn the timer off by pushing the knob in. If the fill continues, pull the washer plug. If filling continues with the washer unplugged, you have a 'mechanical' overflow problem - most always the fill valve ass'y. Not an expensive part, most are less than $20. If however, the fill stops when you unplug the machine, you are looking at an electrical fill control problem, and it gets a little more complicated. Here a small piece of rubber or plastic tubing is handy. Unplug the washer and access the console where you'll see the pressure switch. This is the switch with a small rubber tube, usually clear, attached. Pull this tube off and replace it with your short tubing. Blow a bit of pressure into the switch using your mouth, and listen for a click, then another when you release the pressure. Hear two clicks? Good! The switch is probably OK, but we're having fun, so let's continue! Plug the washer back in (being aware that components in the console are now 'hot' - be careful), and start the washer filling again. With it filling, again blow a bit of pressure into the switch. If the switch is good, the fill should stop and the machine should start to agitate. This verifies that the pressure switch is working, and causes us to suspect the pressure tubing or a clogged port/dome to which it connects. Wipe off the end of the original tube you removed from the switch, and blow into it. You're blowing air down into the tank now, and you should feel very little restriction. If it is very hard or impossible to blow through this tube, the tank dome or port is clogged. Older Maytags are known for this, and if you have one, remove the 'Corbin' clamp from the pressure tube outside of the tank and pull the tube off. (Pull washer front off, 2 screws release top; spin any water out of the washer first, of course!) You will probably see 'gunk' clogging both the rubber tubing and the 'spud' that is a part of the tank. The hose ass'y can be taken to a sink and easily flushed clean, and an old toothbrush used to clear the tank spud, which in the Maytag version is about 3/4 in ID. If your washer is a newer Whirlpool-made product with the plastic tank, these too are known for clogging, but are tougher to clear. They're best cleaned from the inside, which means pulling the tub. Not beyond the reach of the handyman, but this job does require a special spanner wrench to remove the tub nut, as well as the removal of some other components. Unless you're really handy, I'd probably recommend this one as a job for the pro. An experienced tech will have seen this before, and be in and out in less than an hour. The tank ports on these are undersized - only about 3/8 in diameter, and hard to clean, even from the inside. A good job, again, for the trusty wetvac. We are hopeful that Whirlpool will soon enlarge or baffle these ports to correct this problem - one of very few 'glitches' these excellent machines have. Whatever your brand, if air can't be blown back through this tube, the port or dome will need cleaning. If you have no trouble blowing pressure through it, remove the tube completely and inspect it carefully. This tube must not have the smallest hole in it, and they can wear through or be chewed by mice. I mention this last because, while it is the least common cause of overflow we see, it does happen and is easily overlooked. We run into this a couple of times every year, usually in the Fall when the mice start staking out warm places to spend the winter. One tip, and this is most important: WHENEVER THE PRESSURE TUBE IS REMOVED, BEFORE REINSTALLING IT, BE SURE ALL THE WATER HAS BEEN SPUN OUT OF THE WASHER! Otherwise, the machine fill level will be wrong, and it will most likely overflow. 2) Some Really Handy Appliance Tools: Here's a short list of some of the tools I use every day and would NOT want to do without, along with some tips on their use: Wet-vac: I know we've talked about this before back in the August '02 issue, but man, oh man, do I wish we had these when I was starting out! The time I could've saved! (Stay with the 5 or 6-gallon version if you plan on picking up much water - and you will!) Here are just a few of many uses: * Defrosting refrig's (along with a one gallon
pressure sprayer full of hot water
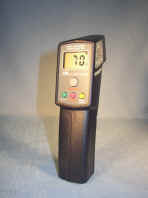
- fastest method on the planet!) Electric screwdriver: Absolutely REQUIRED! Articulating type is awesome for tight spots! No more Carpal Tunnel! Caution: you'll mumble to yourself from now on whenever you have to use a manual driver! Digital 'oven' thermometer: There's just no way to accurately calibrate an oven without a remote-sensing thermometer, and digital's the ONLY way to fly! And you'll find other uses for it - dryer outlet/t'stat temps, refrigerator & freezer temp monitoring, etc. IR thermometer: Again, not an absolute necessity, but a REAL timesaver; point and read instant temps. Great for checking refrig equip't temps. No more thermometers in the pickle jar or ice cream and waiting 10 minutes! Here's one version: Hose pinch-off pliers (#KD145):
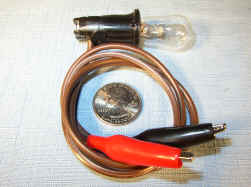
Get at least one pair of these, preferably 3 - they will save your HIDE at least twice in your life! 240V/10W incandescent test bulb, with 18” alligator-clip leads:
The only tool in my pockets that gets more use is my pocketknife! And I always carry a bunch of compact tools in my pockets! Digital Volt-Ohm-Milliammeter (VOM): I like the inexpensive 'pen' type for the truck toolbox. These are compact, take a beating, and very accurate. Bare neon bulbs: Quickly test for the presence of microwave energy and proper 'stirrer' operation inside a MW oven. The neon gas in these bulbs is 'excited' by microwave energy, and they glow beautifully in its presence. Very impressive to the uninitiated! Small testers with neon bulbs imbedded in clear acrylic used to be readily available, can be carried in a pocket, and are nearly indestructible. (I can remember stripping neon bulbs out of old appliances and shoving them inside clear plastic tubing to carry in a pocket in the 'old days' before these were available). Appliance 'flipper' dolly: These let you tip a washer or dryer over to a handy working angle, where it'll stay while you roll it around. There are several types, but the small, folding style is a real back-saver, and can be carried tucked under an arm. This is another one of those tools I'd never want to do without. I've prevented a lot of floor damage with ours. Also use it folded, as a heavy-duty 'pry bar' to lift refrigerators, washers, etc, to put shims under them or adjust their feet. Sincerely, Dave's Repair Service Copyright
www.DavesRepair.com , All Rights Reserved |


